GNAT Studio
This chapter presents an introduction to the GNAT Studio, which provides an IDE to develop applications in Ada. For a detailed overview, please refer to the GNAT Studio tutorial. Also, you can refer to the GNAT Studio product page for some introductory videos.
In this chapter, all indications using "→" refer to options from the GNAT Studio menu that you can click in order to execute commands.
Start-up
The first step is to start-up the GNAT Studio. The actual step depends on your platform.
Windows
You may find an icon (shortcut to GNAT Studio) on your desktop.
Otherwise, start GNAT Studio by typing
gnatstudioon the command prompt.
Linux
Start GNAT Studio by typing
gnatstudioon a shell.
Creating projects
After starting-up GNAT Studio, you can create a project. These are the steps:
Click on
Create new projectin the welcome windowAlternatively, if the wizard (which let's you customize new projects) isn't already opened, click on
File→New Project...to open it.After clicking on
Create new project, you should see a window with this title:Create Project from Template.
Select one of the options from the list and click on
Next.The simplest one is
Basic > Simple Ada Project, which creates a project containing a main application.
Select the project location and basic settings, and click on
Apply.If you selected "Simple Ada Project" in the previous step, you may now select the name of the project and of the main file.
Note that you can select any name for the main file.
You should now have a working project file.
Building
As soon as you've created a project file, you can use it to build an application. These are the required steps:
Click on
Build→Project→Build AllYou can also click on this icon:

Alternatively, you can click on
Build→Project→Build & Run→<name of your main application>You can also click on this icon:

You can also use the keyboard for building and running the main application:
Press
F4to open a window that allows you to build the main application and click onExecute.Then, press
Shift + F2to open a window that allows you to run the application, and click onExecute.
Debugging
Debug information
Before you can debug a project, you need to make sure that debugging symbols have been included in the binary build. You can do this by manually adding a debug version into your project, as described in the previous chapter (see GPRbuild).
Alternatively, you can change the project properties directly in
GNAT Studio. In order to do that, click on Edit →
Project Properties..., which opens the following window:
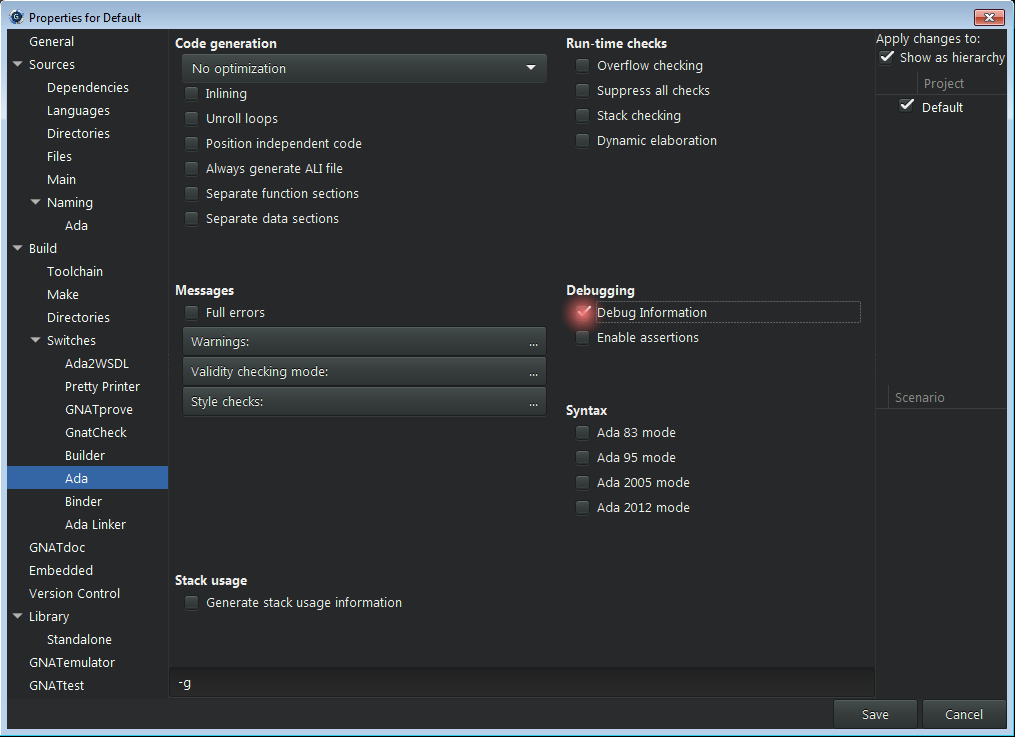
Click on Build → Switches → Ada on this window,
and make sure that the Debug Information option is selected.
Improving main application
If you selected "Simple Ada Project" while creating your project in the beginning, you probably still have a very simple main application that doesn't do anything useful. Therefore, in order to make the debugging activity more interesting, please enter some statements to your application. For example:
with Ada.Text_IO; use Ada.Text_IO;

procedure Main is
begin
   Put_Line ("Hello World!");
   Put_Line ("Hello again!");
end Main;
Debugging the application
You can now build and debug the application by clicking on
Build → Project → Build & Debug →
<name of your main application>.
You can then click on Debug → Run... to open a window that
allows you to start the application. Alternatively, you can press
Shift + F9. As soon as the application has started, you can press
F5 to step through the application or press F6 to execute until
the next line. Both commands are available in the menu by clicking on
Debug → Step or Debug → Next.
When you've finished debugging your application, you need to terminate
the debugger. To do this, you can click on Debug →
Terminate.
Formal verification
In order to see how SPARK can detect issues, let's create a simple
application that accumulates values in a variable A:
procedure Main
  with SPARK_Mode is

   procedure Acc (A : in out Natural;
                  V :        Natural) is
   begin
      A := A + V;
   end Acc;

   A : Natural := 0;
begin
   Acc (A, Natural'Last);
   Acc (A, 1);
end Main;
You can now click on SPARK → Prove All, which opens a
window with various options. For example, on this window, you can select
the proof level — varying between 0 and 4 — on the
Proof level list. Next, click on Execute. After the prover has
completed its analysis, you'll see a list of issues found in the source
code of your application.
For the example above, the prover complains about an overflow check that
might fail. This is due to the fact that, in the Acc procedure,
we're not dealing with the possibility that the result of the addition
might be out of range. In order to fix this, we could define a new
saturating addition Sat_Add that makes use of a custom type
T with an extended range. For example:
procedure Main
  with SPARK_Mode is

   function Sat_Add (A : Natural;
                     V : Natural) return Natural
   is
      type T is range Natural'First .. Natural'Last * 2;

      A2     : T          := T (A);
      V2     : constant T := T (V);
      A_Last : constant T := T (Natural'Last);
   begin
      A2 := A2 + V2;

      --  Saturate result if needed
      if A2 > A_Last then
         A2 := A_Last;
      end if;

      return Natural (A2);
   end Sat_Add;

   procedure Acc (A : in out Natural;
                  V :        Natural) is
   begin
      A := Sat_Add (A, V);
   end Acc;

   A : Natural := 0;
begin
   Acc (A, Natural'Last);
   Acc (A, 1);
end Main;
Now, when running the prover again with the modified code, no issues are found.